เริ่มต้นเนื้อหา

ดาวน์โหลดคู่มือ / Documentation
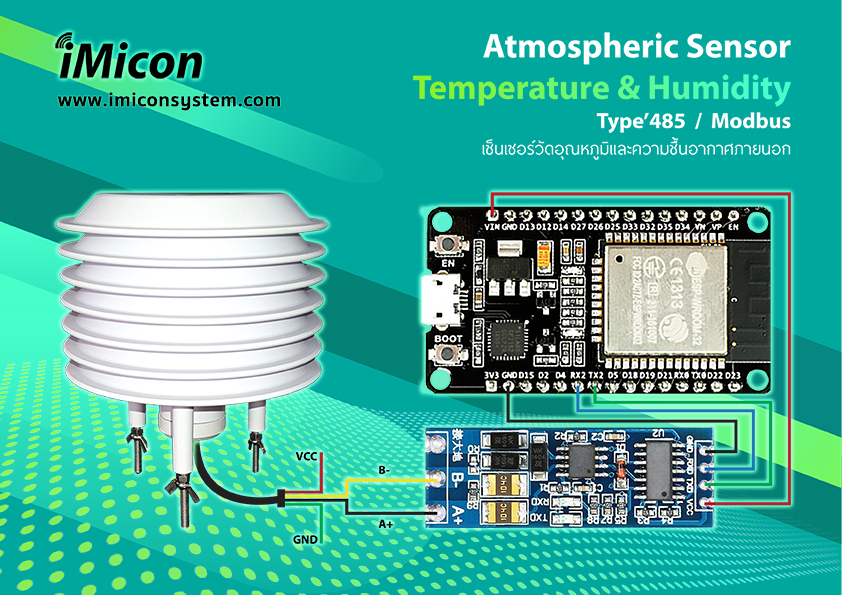
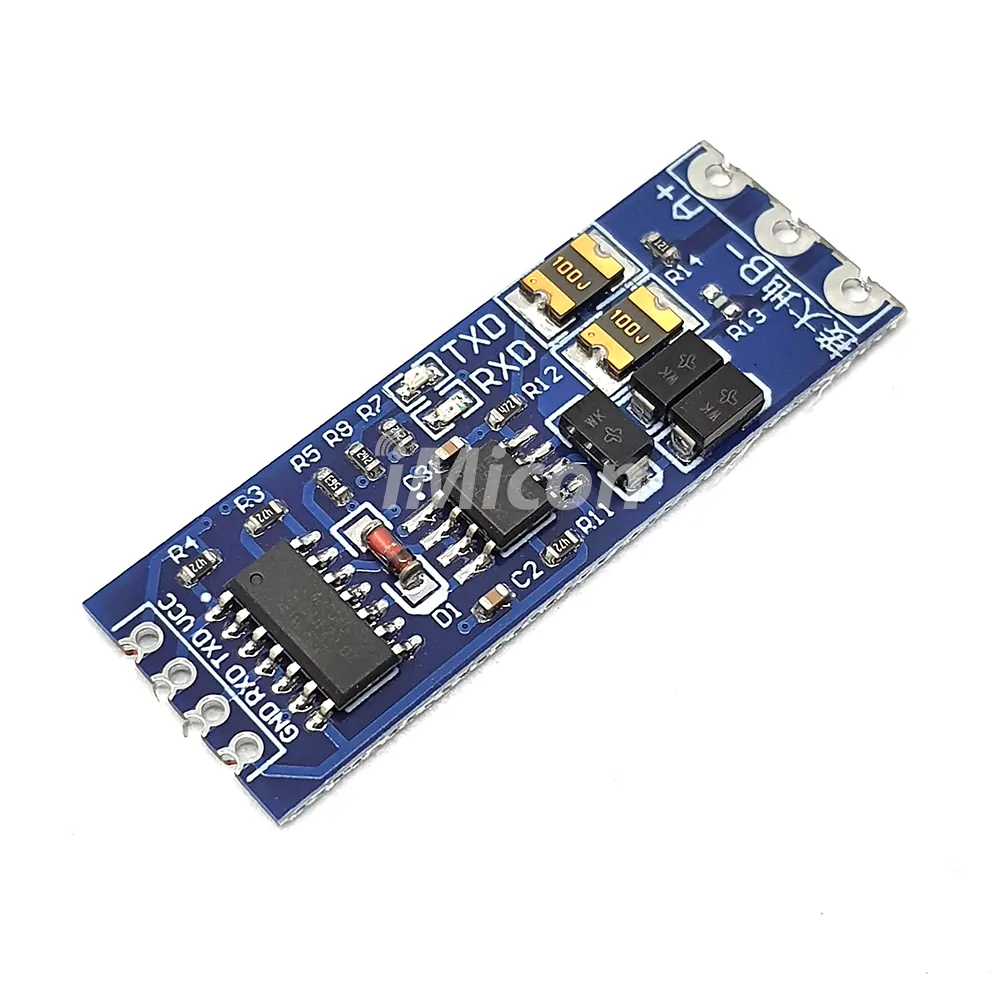
bgt-wsd2-auto-direction
bgt-wsd2-auto-directionbgt-wsd2-auto-directionเชื่อมต่อกับ BGT-WSD2 กับ ESP32 Dev Kit V1 ด้วย RS-485 module [ UART , auto direction control ]bgt-wsd2-auto-directionESP32 devkit v1 connect with Temperature & Humidity Sensor BGT-WSD2 throught UART port via Modbus-RTU protocol using RS485 auto direction module
| #define RXD2 16 | |
| #define TXD2 17 | |
| byte ByteArray[250]; | |
| int ByteData[20]; | |
| void setup() { | |
| Serial.begin(9600); | |
| Serial2.begin(9600, SERIAL_8N1, RXD2, TXD2); | |
| } | |
| void loop() { | |
| delay(500); | |
| byte msg[] = {0x01,0x03,0x00,0x00,0x00,0x02,0xC4,0x0B}; | |
| int i; | |
| int len=8; | |
| Serial.println(); | |
| Serial.println(); | |
| Serial.println("BGT-WSD2 => SEND DATA"); | |
| for(i = 0 ; i < len ; i++){ | |
| Serial2.write(msg[i]); | |
| Serial.print("["); | |
| Serial.print(i); | |
| Serial.print("]"); | |
| Serial.print("=>"); | |
| Serial.print(String(msg[i], HEX)); | |
| Serial.print(" "); | |
| } | |
| len = 0; | |
| Serial.println(); | |
| Serial.println(); | |
| int a = 0; | |
| while(Serial2.available()) | |
| { | |
| ByteArray[a] = Serial2.read(); | |
| a++; | |
| } | |
| int b = 0; | |
| String registros; | |
| Serial.println("DATA RECEPTION => BGT-WSD2"); | |
| for(b = 0 ; b < a ; b++){ | |
| Serial.print("["); | |
| Serial.print(b); | |
| Serial.print("]"); | |
| Serial.print("=>"); | |
| registros =String(ByteArray[b], HEX); | |
| Serial.print(registros); | |
| Serial.print(" "); | |
| } | |
| Serial.println(); | |
| Serial.println(); | |
| Serial.println("REGISTERS HEX"); | |
| ByteData[0] = ByteArray[3] * 256 + ByteArray[4]; | |
| Serial.println(ByteData[0],DEC); | |
| ByteData[1] = ByteArray[5] * 256 + ByteArray[6]; | |
| Serial.println(ByteData[1],DEC); | |
| Serial.println(); | |
| Serial.println(); | |
| float Temperature,Humidity; | |
| Temperature = ByteData[0] * 0.1; | |
| Humidity = ByteData[1] * 0.1; | |
| Serial.println("BGT-WSD2 => Result"); | |
| Serial.print("Temperature = "); | |
| Serial.println(Temperature); | |
| Serial.print("Humidity = "); | |
| Serial.println(Humidity); | |
| delay(200); | |
| } |
 by
by

เชื่อมต่อกับ BGT-WSD2 กับ Arduino Nano ด้วย RS-485 module [ non auto direction control ] Code ตัวอย่างทดสอบอ่านค่า
| //MAX485 TTL To RS485 >> VCC >> +5V or +3.3V of Arduino Nano | |
| //MAX485 TTL To RS485 >> GND >> GND of Arduino Nano | |
| //MAX485 TTL To RS485 >> RO >> GPIO10 of Arduino Nano (SoftwareSerial RX) | |
| //MAX485 TTL To RS485 >> DI >> GPIO11 of Arduino Nano (SoftwareSerial TX) | |
| //MAX485 TTL To RS485 >> RE >> GPIO9 of Arduino Nano | |
| //MAX485 TTL To RS485 >> DE >> GPIO9 of Arduino Nano | |
| #include <SoftwareSerial.h> | |
| #define RX 10 //Serial Receive pin | |
| #define TX 11 //Serial Transmit pin | |
| #define RTS_pin 9 //RS485 Direction control | |
| #define RS485Transmit HIGH | |
| #define RS485Receive LOW | |
| SoftwareSerial RS485Serial(RX, TX); | |
| int ByteData[20]; | |
| void setup() { | |
| pinMode(RTS_pin, OUTPUT); | |
| Serial.begin(9600); | |
| Serial.println("BGT-WSD2"); | |
| RS485Serial.begin(9600); | |
| delay(1000); | |
| } | |
| void loop() { | |
| digitalWrite(RTS_pin, RS485Transmit); | |
| byte TempHumi_request[] = { | |
| 0x01, // Devices Address | |
| 0x03, // Function Code | |
| 0x00, // Start Address | |
| 0x00, // Start Address | |
| 0x00, // Read Points | |
| 0x02, // Read Points | |
| 0xC4, // CRC LOW | |
| 0x0B // CRC HIGH | |
| }; | |
| RS485Serial.write(TempHumi_request, sizeof(TempHumi_request)); | |
| RS485Serial.flush(); | |
| digitalWrite(RTS_pin, RS485Receive); | |
| byte TempHumi_buf[8]; | |
| RS485Serial.readBytes(TempHumi_buf, 8); | |
| ByteData[0] = TempHumi_buf[2] * 256 + TempHumi_buf[3]; | |
| ByteData[1] = TempHumi_buf[4] * 256 + TempHumi_buf[5]; | |
| Serial.println(); | |
| float Temperature,Humidity; | |
| Temperature = ByteData[0] * 0.1; | |
| Humidity = ByteData[1] * 0.1; | |
| Serial.println("BGT-WSD2 => Result"); | |
| Serial.print("Temperature = "); | |
| Serial.print(Temperature); | |
| Serial.println(" C "); | |
| Serial.print("Humidity = "); | |
| Serial.print(Humidity); | |
| Serial.println(" % RH "); | |
| Serial.println(); | |
| Serial.println(); | |
| delay(200); | |
| } |
เพิ่มเติมเกี่ยวกับปรับตั้งค่า ด้วยโปรแกรม
QModMaster ร่วมกับ RS-485 to USB Converter Module
Download : https://sourceforge.net/projects/qmodmaster/
โปรดตรวจสอบความถูกต้องของสายในการต่อใช้งาน
ตัวอย่างต่อไปนี้ ทดสอบบนโปรแกรม qModMaster Version 0.5.2
โปรแกรมในบางเวอร์ชั่นอาจมีการใช้งานที่แตกต่างเล็กน้อย
ในตัวอย่างต่อไปนี้ผู้ใช้ควรมีความรู้เบื้องต้นเกี่ยวกับแปลงเลขฐาน
โปรดใช้งานร่วมกับคู่มือจากผู้ผลิต Documentation
เรียกดู USB to RS-485 converter module ที่กำลังใช้งานว่าต่ออยู่กับ Serial port com ใหน

ตั้งค่า Serial port ให้ตรงกับ port ที่กำลังใช้งานอยู่

ปรับค่า พารามิเตอร์ต่างๆ ให้ตรงตามความต้องการใช้
การอ่านค่าอุณหภูมิและความชื้นสัมพัทธ์ของอากาศ
Read temperature and humidity integrativedata (eg: read data of address 1)

ขั้นตอนการอ่านค่า อุณหภูมิ/ความชื้น
1. กดปุ่ม disconnect
2.กำหนดค่า
-Slave Addr = 1 (Default ID from factory)
-Function Code = Read Holding Register (0x03)
-Start Address = 0 Dec
-Number of Coils = 2
-Data Format = Dec
3.กดปุ่ม connect
4.กดปุ่ม read/write
ค่าที่ได้จากตัวอย่างนี้
333 จะเท่ากับอุณหภูมิ 33.3 C
242 จะเท่ากับความชื้นสัมพัทธ์ 24.2 %Rh
การอ่านค่า ID ของเซ็นเซอร์ BGTWSD2
Read device address (eg: read address 01)

ขั้นตอนการอ่านค่า ID
1. กดปุ่ม disconnect
2.กำหนดค่า
-Slave Addr = 0
-Function Code = Read Holding Register (0x03)
-Start Address = 32 Dec
-Number of Coils = 1
-Data Format = Dec
3.กดปุ่ม connect
4.กดปุ่ม read/write
เปลี่ยนค่า ID ของเซ็นเซอร์ BGTWSD2
Write device address (eg: write address 02)

ขั้นตอนการเปลี่ยน ID
1. กดปุ่ม disconnect
2.กำหนดค่า
-Slave Addr = 0 หรือ 1 (Default ID from factory)
-Function Code = Write Single Register (0x06)
-Start Address = 32 Dec
-Number of Coils = 1
-Data Format = Dec
-Set ID = 2 (เลขไอดีที่ต้องการ)
3.กดปุ่ม connect
4.กดปุ่ม read/write
เปลี่ยนค่า Baud Rate ของเซ็นเซอร์ BGTWSD2
Write device communication baud rate (eg: write baud rate of 4800)

ขั้นตอนการเปลี่ยน Baud Rate
1. กดปุ่ม disconnect
2.กำหนดค่า
-Slave Addr = (ID)
-Function Code = Write Single Register (0x06)
-Start Address = 16 Dec
-Number of Coils = 1
-Data Format = Dec
-Set Baud Rate = 1 (เลข Baud Rate ที่ต้องการ)
Baud Rate 4800 / 0001 Hex / 1 Dec
Baud Rate 9600 / 0002 Hex / 2 Dec
Baud Rate 14400 / 0003 Hex / 3 Dec
Baud Rate 19200 / 0004 Hex / 4 Dec
Baud Rate 38400 / 0005 Hex / 5 Dec
Baud Rate 57600 / 0006 Hex / 6 Dec
Baud Rate 115200 / 0007 Hex / 7 Dec
3.กดปุ่ม connect
4.กดปุ่ม read/write
5.เฉพาะขั้นตอนของการเปลี่ยน Baud Rate
หลังจากเปลี่ยน Baud Rate เรียบร้อยแล้ว ปลดแหล่งจ่ายของเซ็นเซอร์
แล้วเชื่อมต่ออีกครั้ง Baud Rate ใหม่จะเริ่มใช้งานได้
If other unsupported baud rates are written, theywillbe automatically restored to 9600after restart.Ifreturns 01 86 ****, it indicates that theconfigurationwas not successful.
หากมีการเขียน Baud Rate อื่นๆ ที่ไม่รองรับ อัตราเหล่านั้นจะถูกกู้คืนโดยอัตโนมัติเป็น 9600 หลังจากรีสตาร์ท หากส่งคืน 01 86 **** แสดงว่าการกำหนดค่าไม่สำเร็จ